Saturday, December 26, 2015

Import Canon EOS 70D H.264 MOV to MPEG-2 for Editing in Pinnacle Studio 15/16

Get some tech support from online, I’ve found out the best way to import Canon EOS 70D MOV to Pinnacle Studio for editing. If you are also in the trouble, seek for the solution below. I will give you some hints. 

The 70D is a little smaller than the popular EOS 5D series, but it remains easy to hold and has a solid feel. Controls have changed for the better over the 60D.The 70D records to SD/SDHC/SDXC memory cards using MPEG-4 AVC/H.264 encoding. You can now choose between recording in the highest quality ALL-I mode or in the more highly compressed IPB codec saving you significant disc space. 

*1,920 x 1,080 (Full HD / 1080p); 1,280 x 720 (720p); or 640 x 480 (VGA) recording

*MOV file format, with variable bitrate MPEG-4 AVC/H.264 encoding
 

Okay, my Canon 70D were in MOV format and my editing software is Pinnacles 15 , how do i edit Canon EOS 70D H.264 MOV files in Pinnacle Studio ? In some cases it has been found that H.264 vides files may not preview properly in Studio 15. The video may show only green preview. 

If this happens, the easy option is to convert Canon 70D H.264 MOV video files for Pinnacle Studio with a professional video conversion tool. 


Brorsoft Video Converter is such a program that available for your choice. With it, you can convert Canon EOS 70D H.264 MOV to Pinnacle Studio and many other programs like Windows Movie Maker, Sony Vegas, Adobe Premiere Pro and more. What's more, all these will be done in three simple steps. No extra codec is needed. This MOV to Pinnacle converter will do all for you. Download the program and read on to see how it works. 

READ MORE: How-To: Import MOV files to Sony Vegas | Open MOV files in EDIUS 

Download MOV to Pinnacle Studio converter: 


How to convert and import Canon EOS 70D MOV files to Pinnacle Studio 

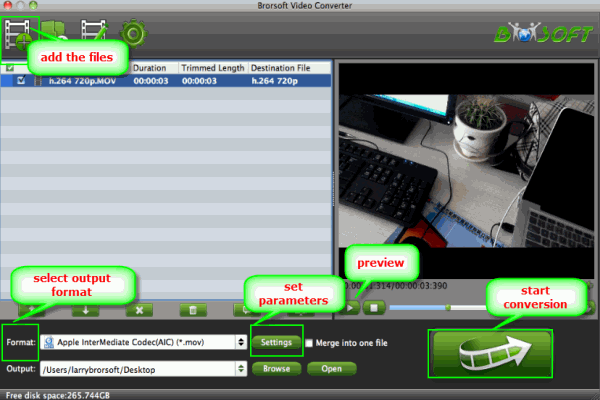
1. Download, install and run the MOV to Pinnacle Studio Converter; click "Add Videos" icon to load your source .mov movies. 


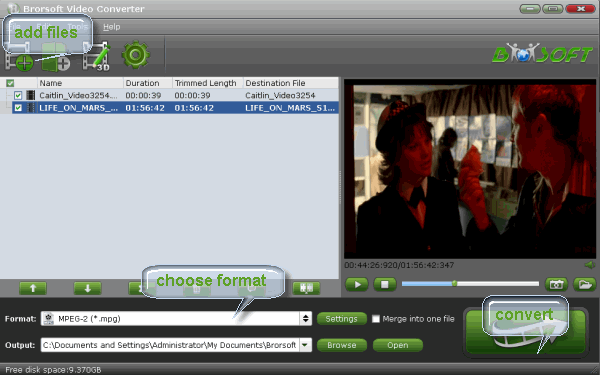
2. Click "Format" bar and choose "Adobe Premiere/Sony Vegas > MPEG-2 (*.mpg)" as output format on the drop-down menu. Of course, you can also choose AVI, MP4, WMV from "Common Video" as the output format. 


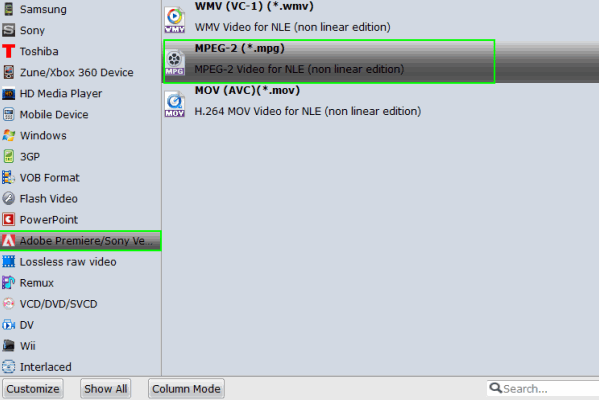
Tip: Click "Settings" button if you'd like to customize advanced audio and video parameters like Video Codec, aspect ratio, bit rate, frame rate, Audio codec, sample rate, audio channels. 

3. Hit the convert button under the preview window, the converter will start encoding Canon 70D MOV for importing to Pinnacle Studio immediately. Soon after the conversion is finished, just click "Open" button to get the generated files for edit in Pinnacle Studio 14/15/16/17 perfectly. 

Related Guides: 
How to Import MOV files to iMovie 
How to Import .MOV files to Adobe Premiere 
Embed and Convert MP4 video in PowerPoint 
How to Import MOV files into Sony Vegas Pro 
Load and Edit JVC GY-LS300 4K in Premiere Pro 
Guide: Transcode 4K MXF/MOV/MP4 to 1080p ProRes 
How do i import Webm to Avid Media Composer (El Capitan) 
Convert Panasonic HDC-HS900 AVCHD to AIC MOV for iMovie

Sunday, December 20, 2015

BD ISO to MKV - Losslessly Finish Blu-ray ISO image files to MKV format Conversion

This guide will show you how to convert Blu-ray ISO files to MKV video files so that you can play Blu-ray ISO image files on much more media players.

An ISO image file is generated when people rip a DVD or Blu-Ray disc, it’s an archive file which contains all the stuff in the disc. When we download movies from internet this kind of file format is pretty common, especially for some special versions such as collecting several bonuses or interviews, etc. In this situation a single video file cannot display these stuff well, that’s why the uploader prefer the ISO format.

MKV is a free multimedia file container that can store multiple video, audio, etc. tracks in a single file. It’ll be much easier to play your Blu-ray ISO movies by converting ISO to MKV video files since MKV is supported by a large number of media players while ISO image files are not that widely supported.

Want to convert Blu-ray ISO to MKV?


In that case, a decent Blu-ray ripper plays a big role. Here Brorsoft Blu-ray Ripper is highly recommended to you to rip your favorite Blu-ray ISO movies to MKV with fast ripping speed and lossless video quality.

What’s more, this professional Ripper not only can support Blu-ray disc, Blu-ray ISO files, Blu-ray folders, but also can deal with DVD, DVD ISO, VIDEO_TS folder. With it, you can also convert DVD/ISO to MP4, AVI, FLV, MKV, MOV, etc. Below is a tutorial for you to rip Blu-ray ISO file to MKV within clicks. If you are a Mac user, then Brorsoft Blu-ray Ripper Mac is your first choice which can transcode Blu-ray ISO file to MKV or other video formats on Mac OS X(Yosemite, Mavericks and E1 Capitan included). Now just follow the below guide.

How to convert Blu-ray ISO to MKV in clicks with ease

Step 1. Add Blu-ray ISO files

After downloading, install and run Blu-ray ISO converter. Then click the "Load Blu-ray" button to add the source ISO files to the program. All loaded files can be previewed on the right viewing window and you can freely take snapshots of the movie scenes you like.


Step 2. Choose MKV as output format

Click Format bar and select "MKV(Matroska) Video (*.mkv)" as output format from "Common Video" category. If you want to get better HD video quality, just select "MKV HD Video (*.mkv)" from "HD Video" category.


Tip: If you need, you can click "Setting" to tweak the detailed video and audio encoding settings.

Step 3. Start converting ISO to MKV videos

Finally, tap the "Convert" button to begin converting Blu-ray ISO files to MKV videos. After a while, you will get the MKV video files for easy playing and uploading.

More Topics:
Digitize Blu-ray Collection
Rip Blu-ray with Subtitles
Rip Disney Blu-ray Discs
Backup Blu-ray Losslessly
Rip Blu-ray on Mavericks
Remove Blu-ray Region Codes
How to convert WebM video files to MP4 in Windows/Mac
Guides about ripping Video_TS movies for uploading to Dropbox
Work H.264 MP4/MOV files with Premiere Pro (Mac El Capitan)
H.264 to H.265-Converting H.264 MP4 Videos Files to H.265/HEVC Files

Saturday, December 19, 2015

Let's Edit Canon G9X/G5X mp4 files in Premiere Pro CC/CS6/CS5/CS4

Meeting the issues when importing the Canon G5X/G9X MP4 recordings to Premiere Pro CC/CS for further editing? Don't worry too much, here we are going to offer you guys the efficient ways to convert MP4 to MPEG-2 MPG in Premiere Pro CC/CS in order to solve the issues. Let's check the solutions below. 

Canon has launched the two new models in the PowerShot G series line of digital compact cameras, called the PowerShot G5X and G9X. Both the PowerShot G5X and G9X, features the bulb exposure feature, that offers greater control over shutter timings. There is also a new Auto ND Filter. The cameras allow you to record 1080p Full HD videos at 24p and up to 60p in MP4 format. 

But, we often fail to import the Canon G9X/G5X MP4 into Premiere Pro CC, CS6, CS5, CS4, WHY? 

Adobe Premiere did announce to import MP4, while it only imports two kinds of MP4: the one is Sony and JVC introduced XDCam-EX movie (.mp4), the other one is Apple created MPEG-4 (.m4v). That is to say, Premiere only import MP4 recorded from Sony camcorder, JVC camcorder or Apple's iPhone, iPad. It will end in fail if you try to import other MP4 file to Premiere


You just need to change the Canon G5X/G9X MP4 clips to something Adobe Premiere Pro could natively handle, and a mpeg2 codec was usually ideal. Brorsoft Video Converter for Mac is just what you need to achieve your goal. 

With this powerful video converter program, you can effortlessly transcode MP4 to Premiere friendly movie format like MPEG-2, MOV (Note: it applies to all kinds of Adobe Premiere including Adobe Premiere Pro, Adobe Premiere Pro CS3/ CS4/ CS5/CS6) keeping the original quality. Besides Adobe Premiere, this software can also export Apple ProRes, AIC, DNxHD for Final Cut Pro, iMovie, FCE, Avid Media Composer and more NLE systems. If you are Windows users, this Video Converter is the alternative choice. Below is the detailed guide on converting Canon G5X/G9X MP4 clips to Premiere Pro friendly videos for smoothly playback and editing. 

Download the MP4 to Premiere Pro Converter: 

 (Note: Click here for OS X 10.5)  

How to Change Canon G9X/G5X MP4 to MPEG-2 for Premiere 

Step 1: Load files 

Launch Video Converter for Mac and drag the Canon G9X/G5X MP4 video files to the program. Or you can click "Add" button to import the files. 


Step 2: Select output format 

Click "Format" bar and choose Adobe Premiere/Sony Vegas -> MPEG-2(*.mpg) as output format for editing Canon G9X/G5X MP4 clips in Premiere. 


Tip: Before conversion, you can click the "Settings" icon to customize the video/audio settings including the Bitrate of Video and Audio, Audio, Video Size, Sample Rate, Frame Rate, Audio Channels, etc for Adobe Premiere. 

Step 3: Start Conversion 

After all the necessary setting have been done, tap "Convert" button to start transcoding Canon G9X/G5X MP4 to MPEG-2. 

Finally, you are able to get the encoded video files via "Open" panel. Now, go to the Premiere File menu, choose Import > Files to open the encoded files effortlessly. 

More Posts: 

MP4 to iMovie 
MP4 to Final Cut Pro 
MP4 to Adobe Premiere 
MP4 to Windows Movie Maker 
MP4 to Avid Media Composer 
How to Convert DVD ISO for Editing in Final Cut Pro X/7/6 
How to convert ISO to Gear VR friendly content for playback 
Edit SWF movies in Premiere Pro CC/CS6/CS5/CS4 (El Capitan) 
How to Convert Canon G5X/G9X MP4 and Import MP4 to Final Cut Pro X/7/6 
Transcode Sony FS7 4K XAVC MXF/1080P ProRes MOV files to DaVinci Resolve 11

Tuesday, December 15, 2015

Convert and Stream DVD ISO to Apple TV 4/3/2 for playing freely

Summary: This is an instructive guide on how to import ISO image files into Apple TV for more convenient playback. 

An ISO file, often called an ISO image, is in fact an "image" of an entire CD, DVD, or Blu-ray. The entire contents of a disc can be perfectly represented in a single ISO file. Chances are you have downloaded or ripped some DVD movies with ISO extension , ever thought of importing them to Apple TV for a better visual experience though HD TV? Well this tutorial will offer you a quick and easy method to help you transfer DVD ISO movies to Apple TV without any hassles! 

As we know, the supported format of Apple TV is limited, and the MP4 format is the perfectly friendly format for Apple TV, thus, if you wanna transfer the ISO files to Apple TV, first you need to do is to convert these ISO files to MP4. To convert ISO to MP4, what you need is a professional ISO to MP4 converter for Apple TV. ISO to Apple TV Converter for Mac, a powerful ISO extracting and ripping software, can help you easily rip ISO to MP4 for Apple TV on Mac OS X with fast speed and excellent output quality. That's where Brorsoft DVD Ripper for Mac comes in. 

Besides converting DVD/Blu-ray ISO files, the program can also help you handle DVD/Blu-ray discs, Video_TS folder. If you are using a PC, please turn to the Windows version, which supports converting ISO files for playing on Apple TV on Windows (Windows 10 included). Download the right program and start enjoying your ISO files with full HD quality on Apple TV! 

How to Convert DVD ISO to play on Apple TV 

Step 1: Import DVD ISO/IFO files to DVD to Apple TV Converter for Mac. 

Launch the best DVD to Apple TV Converter for Mac. Click the ISO/IFO button to add DVD ISO/IFO to it. If necessary, you can double click the each file to have a preview. 

Tip: Freely select the subtitles for you DVD movies from the “Subtitles” option. Thus, you can put DVD movie onto the Apple TV with preferred subtitles. 

Step 2: Select an output format for the Apple TV and set the output folder. 

Click on the dropdown menu of “Format” and then move your pointer to “HD video > “H.264 HD Video (*.mp4)” which is the compatible format for Apple TV. You can also choose the format from the “Apple TV” sublist, which are all compatible for the new Apple TV. Then you can set the output folder by clicking “Browse” icon as you need. 

Step 3: Click “Settings” icon to adjust audio and video parameters. 

Click the “Settings” icon and you will go into a new interface named “Profile Settings”. You can adjust codec, aspect ratio, bit rate, frame rate, sample rate and audio channel in the interface according to your needs and optimize the output file quality. 

Tip: Though the new Apple TV can support H.264 video up to 1080p, 30 frames, 720*480 is the best video size to set here due to the source DVD movie’ s native resolution. 

Step 4: Start converting your DVD ISO/IFO to MP4 for the Apple TV on Mac. 

Click the “Convert” button; it will rip DVD ISO/IFO to MP4 for the Apple TV on Mac immediately. You can find the process in the “Conversion” interface. 


After DVD ISO/IFO to MP4 for Apple TV conversion, you can get the output files for Apple TV via clicking on “Open” button effortlessly. Now you can sync/copy DVD ISO/IFO to the Apple TV on Mac freely. You should know, for streaming media from a Mac, iTunes must be 10.6 or later. And to get 5.1 sorround sound, AV Reciever is necessary. 

Stream ripped DVD ISO on Apple TV via AirPlay or iTunes: 

Via AirPlay: 

Firstly, to use AirPlay, you need to prepare one of the following devices: iPhone 4 (or later), iPad, iPad mini, or iPod touch (4th generation or later). Add the ripped DVD ISO movies to iTunes and sync to your iOS device. 

Secondly, be sure iOS device and Apple TV are in the same Wi-Fi network; start play the video on your device, and then swipe up from the bottom of your device screen to access Control Center and tap AirPlay; 

Thirdly, tap the name of the device you want to AirPlay to. 

Via iTunes: 

Firstly, add the ripped DVD ISO videos to iTunes. Then, go to iTunes > Preferences, choose Apple TV, and make sure "Look for Apple TVs" is selected. 

Secondly, on your Apple TV, choose Settings > Computers > "Connect to iTunes," and note the passcode displayed; in iTunes, select the Apple TV (below Devices), and enter the passcode. 

Thirdly, click the Summary button and select one of "Automatic Sync" and "Custom Sync". 

After all the operation, you should be able to Play DVD ISO through Apple TV on HD/Smart/3D/4K/ TV freely. Just enjoy now! 

More Topics: 
Convert ISO to MP4 
Convert ISO to MKV 
Convert ISO to DivX 
Play ISO files on Mac 
Convert ISO to Chromebook 
How to Easily Convert Blu-ray to H.264 MP4 
Get 4K videos playable onto the new Apple TV 
Get ISO image onto iPad Mini 4/3/2 for easy viewing 
How to convert .dvdmedia to MOV/MP4 on Mac easily 
How to import Nikon D5500 MOV files into EDIUS 5/6/7 
Guide to Convert FLV to PowerPoint supported video formats

Wednesday, December 9, 2015

Sony FS700 to FCP - Edit FS700 1080P AVCHD in Final Cut Pro 7, FCP X (El Capitan)

Couldn’t load Sony FS700 1080-60p AVCHD footage to FCP X for editing, what to do? This post is going to give a solution to this question.

Very similar to the Sony FS100, the Sony FS700 professional camcorder shoots video recordings to AVCHD format. It can film at up to 960 frames per second, and has a 4K sensor (11.6 Mega Pixel).

Video Format HD: HD MPEG-4 AVCHD format compatible +1080/60p original format)
SD: MPEG-2 PS (Same as DVD)

Currently 1080/60p footage is a very non-standard format and it’s unsupported by most editing programs. Plus, if you got some single MTS clips from Sony FS700, the NLEs even won’t recognize your files without the intact folder structure.


FCP should read the mts videos if the AVCHD volume structure is kept as unaltered. Otherwise, Final Cut Pro would not read the .mts files directly. If you only saved some loose .mts videos without keeping an entire AVCHD file structure, you need to use an MTS to FCP Converter program on Mac to do format conversion before editing. The recommended solution is Brorsoft MTS/M2TS Converter for Mac, you can run it as an MTS to ProRes Converter.

For Windows users, please get MTS/M2TS Converter. Download the software and learn how to convert Sony FS700 AVCHD to MOV on Mac OS X in detail.

Download AVCHD to MOV Converter:

(Note: Click here for OS X 10.5)

Tutorial on converting Sony FS700 AVCHD to Final Cut Pro 7/X in simple steps

1. Launch the Converter on Mac and import the Sony FS700 50p/60p MTS videos into program by clicking “Add” button. Or you can drag&drop the files to app directly.


2. Go to “Format” bar and choose “Final Cut Pro> Apple PreRes 422″ or “Apple ProRes 422 HQ” or “Apple ProRes 4444″ as the output format. If you are a FCP 6 or previous user, “Final Cut Pro> Apple PreRes 422″ is the only output format that you can choose.


Tip: If you want to customize the output profile parameters, you can click settings button to adjust video size, bitrate, framerate, channels .etc.

3. Tap the convert button, the program will start Sony FS700 footages to FCP X/7 conversion immediately.

After conversion just click the “Open” button to locate encoded video files for FCP post-production seamlessly. Now, launch Final Cut Pro, choose File >> Import >> Files…to load your encoded Sony FS700 1080P AVCHD video files.

More Topics:
Import MTS clips to FCP
Convert MTS to Andorid
Convert 3D AVCHD MTS
Trancode MTS for Premiere
Transcode MTS to Pinnacle
How to Convert Video_TS Folder to MP4
Play CDs/DVDs ISO Files on Mac OS X ( El Capitan)
Transfer DVDs to USB Drive for Sony HDTV Playback
Rip and copy DVD/Blu-ray to USB flash drive for HDTV
How to Get Premiere Pro work with Canon XA30 AVCHD fiels
How to import 4K MP4/MOV/AVCHD from Panasonic HC-X1000 to Avid

Tuesday, December 8, 2015

Transfer DVDs to USB Drive for Sony HDTV Playback

Summary: Have a Sony TV, then how to transfer some DVDs to it via USB for playback? Get solution from this article which tells you how to play DVD on Sony TV via USB easily and quickly.

Sony Smart TV is very popular in the market; many customers bought it to play high-definition movies on it. Well, here we turn to the point is how can we play DVD on Sony TV via USB as we’ve no DVD player connected with the TV.

Since PC can read DVD discs very well, we can rip all the DVD movies to MP4 or other common format, put them on the external hard drive, and then transfer to Sony TV via USB for playback without any extra effort. What we need is a powerful DVD ripping tool.

Here Brorsoft DVD Ripper is highly recommended to you, which can help you achieve the goal easily. With it, you can rip DVD to kinds of HDTV friendly video with the best quality. It has many optimized formats for HDTVs including Sony/Samsung/LG/Panasonic TV as well popular tablets, smartphones and editing programs, so it will meet all your needs. For Mac users, please turn to DVD Ripper for Mac, which enables you to rip DVDs to Sony TV friendly video on Mac OS X(Yosemite/El Capitan included).

How to Convert DVDs to Sony TV friendly video

Step 1. Launch the DVD Ripper for Sony TV. Insert the DVD disc to your computer drive, and then click the "DVD disc" icon on the interface to navigate to the movies you want to convert. You can also add ISO file, IFO file or DVD folder.


Step 2. Click the "Format" drop-down button to select HDTV more compatible video. You can easily choose a decent profile “Sony TV (*.mp4)” from TVs profile list.


Tip: Advanced settings(optional)

You can click the Settings icon and adjust the video bitrate, codec, frame rate, audio sample rate, etc parameters.

Step 3. Hit Convert button to start ripping DVD to Sony HDTV compatible MP4 video instantly.

After the conversion, click Open to locate the resulted videos. Drag the converted files to your USB drive for transferring and playing with Sony Smart TV with ease.

Related Guides:

How to Convert Video_TS Folder to MP4
How to Rip DVDs to Panasonic TV via USB
How to Rip and Stream DVD movies via Roku
2 solution to view Video_TS files on Windows PC
How to Rip DVD for Playback on Amazon Fire TV
Guide: Convert TiVo recordings to Plex friendly video
How to make TiVo editable in Adobe Premiere Elements
How to Convert DVD ISO for Editing in Final Cut Pro X/7/6
How to convert iPhone 6S 4K video to DNxHD for Avid MC
Convert DVD VIDEO_TS folder to play on Android devices
How to convert ISO to Gear VR friendly content for playback
How to Rip DVD Movies for Playback with Samsung Gear VR

Wednesday, December 2, 2015

WebM to MP4 Converter - Easily Convert WebM to MP4 on Windows and Mac

Want to play WebM on iTunes, iPhone, iPad, iPod, iMovie, QuickTime, PS3, Xbox 360, etc? Free download this powerful WebM to MP4 Converter to get what you need.

WebM vs MP4, which is better? What’s the differences between WebM and MP4? I would like to get the better quality, so which one should I choose, WebM or MP4?

A WebM file consists of VP8 video and Vorbis audio streams, in a container based on a profile of Matroska. It is an audio-video format designed to provide royalty-free, open video compression for use with HTML5 video.

MPEG-4 Part 14 or MP4 is one of the most commonly-used container format that is able to host any number of video, audio, subtitles, images, chapters in a single file. It also allows for advanced content such as 3D graphics, menus and user interactivity. Similar to container format WebM or MKV, it is able to be streamed over the Internet.

Both WebM and MP4 has their own pros and cons. Which is better WebM or MP4? Or which one should you choose? That largely depends on the tasks you are going to do with them. As mentioned above, MP4 is widely used on almost all the mobile devices, so if you want to download or convert a video for mobile playback, choose MP4.

So when you download some WebM file extension videos from website, do you want to convert WebM to MP4 for playing on MP4 players.


Well, Brorsoft iMedia Converter for Mac has come up with a solution for the conversion task. This WebM video converter is able to convert your favorite WebM video into MP4 format on Mac(El Capitan included) for easier playback on your media devices without damaging the original quality. And here comes the best part, it not only transforms WebM to MP4 format, but also can convert WebM to AVI, MOV, FLV, WMV, MPG, 3GP, etc format to meet your different needs. With its built-in editor, you can trim, crop, add effects, insert subtitles as well as merge a pile of videos into one file. For those who are running on Windows, you can turn to Blu-ray Video Converter Ultimate.

Download the best WebM to MP4 Converter:


How to convert WebM video files to MP4 in Windows/Mac

Step 1. Add WebM videos

Install and launch the Mac WebM to MP4 converter program, then click Add to import the WebM video files for converting. Alternatively, you can directly drag video files to the item bar for conversion. Batch conversion is well supported so you can add many files at a time for conversion.


Step 2. Select MP4 as output format

Click Format bar and choose MP4 as output format. From the drop-down list of "Format" > "Common Video", you can select H.265 MP4, H.264 MP4, MPEG-4 as the output format. If you want to get HD video quality, select "H.264 HD Video (*.mp4)" from "HD Video" category.


Tip: Advanced Settings Click the "Settings" icon and you will go into a new interface named "Profile Settings". You can adjust codec, bit rate, frame rate, sample rate and audio channel in the interface according to your needs and optimize the output file quality.

Step 3. Start conversion

When all settings are done, click the big Convert button to start converting WebM video to MP4. When the conversion completes, click Open button to locate the output video. And now all is done. Just enjoy your movies!

More Topics:

Guide: Convert and Import WebM to Final Cut Pro
Convert WebM video files to MP4 in Windows/Mac
How to Convert WebM videos for Playback and Editing
How to Convert WebM video clips to iMovie(iMovie 11)
Read and Get the 2015 Top 5 Free DVD Rippers Reviews
How to convert and play Video_TS folder on Apple TV 4/3/2
Guides about converting VOB movies for uploading to Dropbox
Import and Edit WebM in iMovie on Mac(El Capitan included)
How to Convert/Import WebM to Sony Vegas Pro for further editing
WebM to FCP - How to Convert/Import WebM files to Final Cut Pro

Transcode Sony DVD Recordings to MP4 for LG TV Playback

Sony's RDR-HXD890 features both a DVD recorder and hard-disk, giving you the flexibility to record, edit and then back-up your recording...